· 11 min read
Cully Wakelin
Tomas Perez

The Resonate SDK provides a way for developers to batch operations transparently

The Resonate Python SDK is shaping up to provide developers with a delightful experience for building distributed applications.

RSVP for the webinar

RSVP for the upcoming webinar to learn more about the Python SDK!

This post highlights one of the SDK’s features that might make you jump for joy.

Let's talk about batching.

Problem space

To ensure we’re all on the same page, "batching" refers to the practice of grouping multiple operations into a single unit of work.

Why do this?

Because performing operations in batches can be much more efficient than processing them one by one.

When we talk about efficiency we could be talking about two different things:

  1. Speed
  2. Resource utilization

With speed, the benefit is clear - things happen faster and you are removing bottlenecks.

With resource utilization, the benefit will often come down to cost savings. In todays cloud environments, you are often charged for resources you use. If a resource is remote and accessed over a network, you may be charged every time you access it.

This level of efficiency might not be significant at smaller scales, but at larger scales, efficiency becomes crucial.

For example, processing 100,000 operations sequentially can be far more costly and time-consuming than batching those 100,000 operations into a single task. Of course, the target system must support batching.

So let's focus on a concrete example.

Consider an application that creates a row in a database for each new user.

If the application gets less than 1 new user per minute, or even every 30 seconds, then it can probably handle sequential inserts. In other words, the application can run and commit one SQL query per new user and there may not ever be a problem.

def _create_user(user: int):
conn.execute("INSERT INTO users (value) VALUES (?)", (user,))
conn.commit()
print(f"User {user} has been inserted to database")

But what if the applications suddenly becomes really popular? What if, hypothetically, it received 1000 new users per second? 🚀 The database would save to durable storage on each query and the application probably wouldn't be able to keep up with all the demand. Each second there would be a longer and longer delay for users to get added to the database. We can imagine that, if these user creation requests were coming over a network, that many of them would timeout while waiting for their turn to get a row in the database.

In this very simplified example, we might now consider batching SQL queries so that more user rows are created per commit.

def _create_users_in_batch(users: list[int]):
for user in users:
conn.execute("INSERT INTO users (value) VALUES (?)", (user,))
conn.commit()
print(f"{len(users)} users have been inserted to database.")

If we can batch thousands of queries into a single commit, then likely the application would be able to keep up with the demand.

In Production

In production, ensure that inserts are idempotent to account for the possibility of retries.

In theory that sounds great. In practice, now you have to manage the complexity of coordinating otherwise concurrent executions to collect a batch.

Sounds like a trade off of on complexity vs developer experience right?

Not if you use Resonate. 😉

Resonate's solution

The Resonate Python SDK gives you a handy set of APIs to manage the practical complexities of batching operations.

If we assume that you are willing to embrace Resonate's programming mode, then at a high level, Resonate just requires that you define a data structure and a handler.

Let's look at how you would implement the use case above with Resonate.

First, create a data structure that inherits what Resonate calls a Command interface. The data structure must include the data to be inserted into the database. The Command data structure stands in for a function execution invocation so that you still get a promise and await on result of the commit.

features/batching/src/batching/init.py

from dataclasses import dataclass
# ...
from resonate.commands import Command
# ...
# Define a data structure for the Resonate SDK to track and create batches of
@dataclass
class InsertUser(Command):
id: int

Then, create a handler that can process a batch of SQL queries. This should look similar to the code that batched the SQL queries above.

features/batching/src/batching/init.py

# ...
from resonate.context import Context
# ...
# Define a function that inserts a batch of rows into the database
# The main difference is that commit() is only called after all the Insert statements are executed
def _batch_handler(_: Context, users: list[InsertUser]):
# error handling ommitted for this example
for user in users:
conn.execute("INSERT INTO users (value) VALUES (?)", (user.id,))
conn.commit()
print(f"{len(users)} users have been inserted to database.")

Next, register the data structure and the handler with the Resonate Scheduler.

features/batching/src/batching/init.py

# ...
from resonate.scheduler import Scheduler
from resonate.storage import LocalPromiseStore
from resonate.retry_policy import never
# ...
# Create a Resonate Scheduler with an in memory promise store
resonate = Scheduler(LocalPromiseStore(), processor_threads=1)
# ...
# Register the batch handler and data structure with the Resonate Scheduler
resonate.register_command_handler(InsertUser, _batch_handler, retry_policy=never())

Finally, create a function that can be invoked over and over again and passes the data to Resonate to manage. Register it with the Resonate Scheduler, and then call that function with Resonate's run() method.

features/batching/src/batching/init.py

# ...
# Definte the top level function that uses batching
def create_user_batching(ctx: Context, u: int):
p = yield ctx.lfi(InsertUser(u))
yield p
# ...
# Register the top level functions with the Resonate Scheduler
resonate.register(create_user_batching, retry_policy=never())
# ...
def main() -> None:
# ...
# Create an array to hold the promises
promises = []

for u in range(10000):
p = resonate.run(f"insert-value-{u}", create_user_batching, u)
promises.append(p)

for p in promises:
p.result()
Coroutines in action

Resonate promotes the use of coroutines anytime there is a need to await on the result of another execution. You will see coroutines generically referred to as functions, but know that you are actually using coroutines whenever a value is yielded into the execution.

From top to bottom, taking into account database setup, a working application would look something like this:

features/batching/src/batching/init.py

from dataclasses import dataclass
from resonate.context import Context
from resonate.scheduler import Scheduler
from resonate.storage import LocalPromiseStore
from resonate.retry_policy import never
from resonate.commands import Command
import sqlite3

# Create an SQLite database if it doesn't exist
# Create a connection with that database
conn = sqlite3.connect("your_database.db", check_same_thread=False)

# Create a Resonate Scheduler with an in memory promise store
resonate = Scheduler(LocalPromiseStore(), processor_threads=1)

# Define a data structure for the Resonate SDK to track and create batches of
@dataclass
class InsertUser(Command):
id: int

# Define a function that inserts a batch of rows into the database
# The main difference is that commit() is only called after all the Insert statements are executed
def _batch_handler(_: Context, users: list[InsertUser]):
# error handling ommitted for this example
for user in users:
conn.execute("INSERT INTO users (value) VALUES (?)", (user.id,))
conn.commit()
print(f"{len(users)} users have been inserted to database.")

# Definte the top level function that uses batching
def create_user_batching(ctx: Context, u: int):
p = yield ctx.lfi(InsertUser(u))
yield p

# Register the top level functions with the Resonate Scheduler
resonate.register(create_user_batching, retry_policy=never())

# Register the batch handler and data structure with the Resonate Scheduler
resonate.register_command_handler(InsertUser, _batch_handler, retry_policy=never())

def main() -> None:
# Drop the users table if it already exists
conn.execute("DROP TABLE IF EXISTS users")
# Create a new users table
conn.execute(
"CREATE TABLE IF NOT EXISTS users (id INTEGER PRIMARY KEY, value INTEGER)"
)
# Create an array to hold the promises
promises = []

for u in range(10000):
p = resonate.run(f"insert-value-{u}", create_user_batching, u)
promises.append(p)

for p in promises:
p.result()

The example above shows that batching happens transparently in the background. The SDK handles the coordination of otherwise concurrent executions on a platform level and you still get to write concurrent, non-coordinated code.

Configure batch size

If you want to ensure a maximum batch size, you need only supply that when registering the handler:

resonate.register_command_handler(InsertUser, _batch_handler, maxlen=1000)

But is this actually more efficient?

Benchmark it

To demonstrate the efficiency we will do the following things.

First, we will adjust our application to support the option to do sequential writes.

features/batching-benchmark/src/batching/init.py

# ...
### SEQUENTIAL INSERTS
# Define a function that inserts a single row into the database
def _create_user(ctx: Context, value: int):
conn.execute("INSERT INTO users (value) VALUES (?)", (value,))
conn.commit()
print(f"User {value} has been inserted to database")

# Define a top level function that uses sequential inserts
def create_user_sequentially(ctx: Context, v: int):
p = yield ctx.lfi(_create_user, v).with_options(retry_policy=never())
yield p
# ...
# Register the top level functions with the Resonate Scheduler
resonate.register(create_user_sequentially, retry_policy=never())

Then we will update our application to expose a simple CLI for us to choose whether to process batch writes or sequential writes. We will also capture the start time and the end time of the operation.

features/batching-benchmark/src/batching/init.py

# ...
import click
import time
# ...
# Define a CLI to create an interaction point
@click.command()
@click.option("--batch/--no-batch", default=False)
@click.option("--users", type=click.IntRange(0, 100_000))
def cli(batch: bool, users: int):
# To benchmark, we start from a clean slate each time
# Drop the users table if it already exists
conn.execute("DROP TABLE IF EXISTS users")
# Create a new users table
conn.execute(
"CREATE TABLE IF NOT EXISTS users (id INTEGER PRIMARY KEY, value INTEGER)"
)
conn.commit()
# Create an array to store all the promises
promises = []
# Capture the starting time of the operation
start_time = time.time_ns()
# If batching, run the batch inserts
if batch:
for v in range(users):
p = resonate.run(f"insert-batch-user-{v}", create_user_batching, v)
promises.append(p)
# If not batching, run the sequential inserts
else:
for v in range(users):
p = resonate.run(f"insert-no-batch-user-{v}", create_user_sequentially, v)
promises.append(p)

# Yield all promises to ensure they are all complete
for p in promises:
p.result()

# Capture the ending time of the operation
end_time = time.time_ns()
print(
f"Inserting {users:,} users took {(end_time-start_time)/1e9:2f} seconds with batching={batch}"
)

def main() -> None:
cli()

Let's run this with 10,000 sequential user inserts.

rye run batching --no-batch --values=10000

First, we will see a log for each and every insert.

Value 0 has been inserted to database
Value 1 has been inserted to database
...
Value 9999 has been inserted to database

And we will see it has taken roughly 3.5 seconds to complete.

Inserting 10,000 values took 3.459524 seconds with batching=False

Now let's run the same number of values using batching.

rye run batching --batch --values=10000

We should notice that we see only about a dozen inserts logged.

Values from 0 to 495 have been inserted to database.
Values from 496 to 1796 have been inserted to database.
Values from 1797 to 2017 have been inserted to database.
Values from 2018 to 3067 have been inserted to database.
Values from 3068 to 3518 have been inserted to database.
Values from 3519 to 5038 have been inserted to database.
Values from 5039 to 6878 have been inserted to database.
Values from 6879 to 7372 have been inserted to database.
Values from 7373 to 7374 have been inserted to database.
Values from 7375 to 8380 have been inserted to database.
Values from 8381 to 8889 have been inserted to database.
Values from 8890 to 9481 have been inserted to database.
Values from 9482 to 9999 have been inserted to database.

And it took less than a second to complete.

Inserting 10,000 values took 0.733565 seconds with batching=True

In this example we can see that batching improves efficiency, both for resource utilization (less inserts to the database). And it becomes more and more impactful at higher volumes. Try it out 50,000 or 100,000 inserts to see for yourself using the batching-benchmark example in the examples-py repository.

Conclusion

The Resonate SDK provides a way for developers to batch operations transparently. The developer need only define a data structure and a handler function that processes the batch. Resonate will then automatically handle the batching and execution of the handler function.

The batching operations that Resonate provides is more efficient in speed and resource usage in comparison to non-batched operations, which could reduce costs.

Want to learn more about the Python SDK? Join the waitlist or RSVP for an upcoming webinar!

· 5 min read
Andres Villegas

The latest version of the Resonate SDK significantly changes its architecture: The new architecture is simpler and removes the use of a ResonatePromise, instead opting for the standard JS Promise. But what problems are we trying to solve with the new architecture, and which new patterns does it enable?

Motivation

The main motivation for the new architecture was to simplify our codebase. The previous architecture had some tangled control flow that made it difficult to reason about, but this tangled flow wasn't there for no reason. There was an inherent problem we needed to solve.

Our primary selling point is that the promises are Durable, meaning they're stored in durable storage. We needed to make a server request to create the DurablePromise and await its completion before we could tell the user the ResonatePromise was ready for use. This led to the complexity we had in the first place.

It was necessary to have many promises inside a ResonatePromise, each signaling different stages in the process of creating a ResonatePromise. For example, we had a created promise to signal that the durable promise was actually created. It also had a another Promise to signal the completion/rejection of the user-passed function. These different promises were created and resolved at different stages and in different parts of the code. They needed to be passed around a quite complex object graph.

The SDK was Dead Simple to use, but not Dead Simple to understand.

Enter the InvocationHandle

As mentioned before, we needed a way to signal that the DurablePromise was created before we could continue with the rest of the execution of the user function. What if we make this step explicit and give the user a Handle to the invocation they just made? When the user receives this handle, it's guaranteed that the durable promise was created and the execution of their function started.

The InvocationHandle holds the result Promise, which is where we put the result of the user function when resolving the promise. The result Promise is created when Invoke is called. Invoke uses an async thunk to do the whole process of executing the user code with the proper retries, resolving or rejecting the durable promise, handling all the different kinds of errors, and finally rejecting or resolving the result Promise held by the InvocationHandle. This pattern is mostly enabled by the good support of lexical closures in JS.

This pattern is so simple that all of it can be expressed in a single function. In fact, most of the current implementation of the Resonate SDK is in a single file, with some other support files to enable extensibility by the user and handle the communication with the Resonate server.

Here's how it looks in JS pseudo-code:

async invokeLocal(func, args, opts): InvocationHandle {
let options = calculateOptsWithDefaults(options)
let id = calculateId()

let durablePromise = await store.createDurablePromise(id, opts)

const runFunc = async (): Promise<R> => {
let error;
let value;
let success = true;
try {
value = await runWithRetry(func, args)
} catch (e) {
success = false;
handleErrorsInUserFunction()
}
if (success) {
await store.resolveDurablePromise(id, value)
resolve(value)
} else {
await store.rejectDurablePromise(id, error)
reject(error)
}
};

// Note we are not awaiting the end of runFunc, we will store it
// in the invocationHandle returned to the user
const resultPromise: Promise<R> = runFunc();
const invocationHandle = new InvocationHandle(resultPromise, id);
return invocationHandle;
}

This pseudocode is the essence of invokeLocal, and I'd argue it's the essence of the Resonate TypeScript SDK. If you look at the actual code, it might not look exactly like this unless you squint hard enough. This pseudo-code omits details like handling unrecoverable errors, invocation caching, eventual consistency, and code to handle a more flexible API and set of options.

The usage of the InvocationHandle will look something like this:

resonate.register('foo', async (ctx: Context) => {
const handle = await ctx.invokeLocal(async (ctx: Context) => {
await setTimeout(1000)
console.log("World")
}, options({retryPolicy: never()}))

console.log("Hello")

let durablePromise = resonate.store.promises.get(handle.invocationId);
console.log(durablePromise.state) // prints: PENDING

await handle.result();

durablePromise = resonate.store.promises.get(handle.invocationId);
console.log(durablePromise.state) // prints: RESOLVED
})

const topHandle = await resonate.invokeLocal("foo", "foo.0")
await topHandle.result()

When the user gets hold of an InvocationHandle, it's guaranteed that we have created a DurablePromise and started executing the user function. Once the user awaits the result() promise, we guarantee to run the user function to completion in the absence of unrecoverable errors.

We still provide the run api as an easier but more opaque way of creating a DurablePromise and run the function to completion, all in a single function call, with the trade off of not having easy access to the DurablePromise id

Wrapping Up

The new Resonate SDK architecture simplifies our codebase while preserving the core functionality of durable promises. By introducing the InvocationHandle and leveraging standard JS Promises, we've addressed the complexities that arose from our previous design.

This new approach offers:

  1. Clearer control flow
  2. Explicit durability guarantees
  3. Simpler implementation

We encourage developers to explore the new SDK and leverage these improved patterns in their applications. Your feedback and innovative use cases will be crucial as we continue to evolve Resonate.

· 4 min read
Gabriel Guerra

Assertions are widely used in testing frameworks such as JUnit (for Java), Jest (for JavaScript), Pytest (for Python), and many others. These frameworks employ assertions to verify the expected external behavior of the system under test (SUT). However, it is less common for developers to use assertions within the production code of the SUT itself. In this post, I’ll explain how internal assertions can help developers ship code faster by catching bugs early, improving code quality and documenting expected behavior.

An assertion is a condition that must always be true. If the conditions is found to be false, the application will terminate. Many programming languages such as Python, Java, C#, Rust and more natively support assertions.

// Python
assert input != 0, "input must be non zero"

// Java
assert input != 0 : "input must be non zero";

// C#
System.Diagnostics.Debug.Assert(input != 0, "input must be non zero");

// Rust
assert!(input != 0, "input must be non zero");

Two Types of Assertions

At Resonate, we consider two types of assertions when writing applications:

  1. External Assertions: These assertions are found in our testing code which relies on the public interface of the SUT and treats it as a black box, without access to its internal state or intermediate steps.

  2. Internal Assertions: These assertions are inside our production code and therefore have access to the internal state and intermediate steps of the SUT, allowing them to make assertions about the system’s internal correctness.

Benefits of Using Internal Assertions

The largest benefits of using internal assertions is that it forces you to think about your code in terms of invariants, preconditions, and postconditions. What are those and why should you care?

Invariants

An invariant is a condition that holds true through the execution of a particular code segment, such as a method or even the life time of the application. There are two common types of invariants: preconditions and post conditions.

Preconditions

A precondition is a condition that must be true before a specific operation is executed. It specifies the assumptions that must be met by the caller of the method.

def something(input):
# precondition

result = do()

return result

Postconditions

A postcondition is a condition that must be true after a specific operation has completed its execution. It specifies the expected outcome or the guarantees provided by the method upon completion.

def something(input):
# precondition

result = do()

# postcondition

return result

The combination of invariants, preconditions, and postconditions help catch bugs earlier because they cannot be ignored! They also serve as better code comments than code comments. Unlike regular comments, internal assertions cannot be outdated because the program with halt!

Internal Assertions vs Error Handling

The biggest concern is knowing when to use assertions vs regular old error handling. At Resonate, we consider two types of errors when writing applications:

  1. Expected Errors: know how to handle the error at the same layer in the software. This might require propagating the error to upper layers of the software.

  2. Unexpected Errors: should kill the application immediately without propagating the error further.

With those two types of errors you can see that assertions are a great fit for unexpected errors. These are errors that break the assumptions you made of how your software works which is why they are unexpected. Another way to think of this is that assertions detect developer errors while error handling detects user errors. User errors are expected and can be handled, while assertion errors signal a misunderstanding of what is possible in your program.

In case an invariant is violated, we want to ensure that "nothing bad will ever happen", therefore shutting down instead of taking another step (arguably, if an invariant is violated, something bad already happened, so you could say we want to ensure that "nothing else bad will happen").

Property-Based Testing with Assertions

Property-based testing (PBT) uses random inputs to check the SUT for high-level invariants or properties. At Resonate, we believe the pairing of internal assertions and PBT provides a powerful approach to ensuring code quality and reliability. This combination allows for extensive exploration of code paths, increasing the likelihood of uncovering bugs and edge cases that may be missed by traditional unit and integration tests.

Evidence of Others Using Assertions

While this approach to using assertions is uncommon, a few notable pieces of software follow this approach.

Conclusion

Thinking about software in terms of invariants has positively shaped the speed and quality of software we deliver. For more examples of how we use assertions, please visit our GitHub repository and check it out for yourself.

· 5 min read
David Farr

In this edition of Resonate Recipes we will explore catchable and non-catchable failure and how Resonate mitigates these failure types.

info

To follow along, head over to the Resonate Recipes repository on GitHub, clone the repository, and navigate to the Basic Failure Handling recipe.

Catchable and Non-catchable Failure

In distributed systems, we have to distinguish between catchable failure and non-catchable failure.

  • Catchable failures refer to the set of failures that can be detected and mitigated by a process itself e.g. in a try catch block. Examples include io failure such as a file not found exception or networking failure such as a request timeout exception.

  • Non-catchable failures refer to the set of failures that cannot be detected and mitigated by a process. My favourite mental model is to imagine the plug being pulled on the machine running a process.

Recovering from catchable failure

Resonate detects and mitigates catchable failure via transparent try catch and by retrying executions. To see this in action, try running the following program. If you have cloned the recipes repo, you can run this example by running npm run catchable.

import { Resonate, Retry } from "@resonatehq/sdk";

// instantiate resonate
const resonate = new Resonate();

// register a function with resonate
resonate.register("foo", async () => {
// try something that might fail
console.log("trying...");

if (Math.random() > 0.5) {
throw new Error("!!! ERROR !!!");
}

console.log("success!");
});

resonate.run("foo", "foo.1", resonate.options({
retry: Retry.exponential()
}));

Running this function directly would, on average, fail 50% of the time. But executing via Resonate (almost) always succeeds. Why is this?

By default when an exception is thrown, a Resonate function will be retried with exponential backoff up until a specified timeout. The default timeout of a Resonate function is ten seconds. This means that our function may be retried up to six times in a single execution, dropping the probability of seeing an exception to just 0.8%.

You can play around with different retry policies by changing the options. Resonate provides exponential, linear, and no retries out-of-the-box.

Retry.exponential();
Retry.linear();
Retry.never();

Recovering from non-catchable failure

Resonate detects and mitigates non-catchable failure, after a process restarts, by restarting executions. We refer to this as the recovery path.

For the following example to work we are going to need the Resonate Server, which can be installed with Homebrew if you are on Mac or downloaded from GitHub.

# install
brew install resonatehq/tap/resonate

# start
resonate serve

To see this type of recovery in action, try running the following program. If you have cloned the recipes repo, you can run this example by running npm run noncatchable.

import { Resonate } from "@resonatehq/sdk";

// instantiate resonate
// this time will will increase the timeout
const resonate = new Resonate({
url: "http://localhost:8001",
timeout: 60000,
});

// register a function with resonate
resonate.register("foo", () => {
// try something that might fail
console.log("trying...");

// simulate unexpected failure
if (Math.random() > 0.5) {
console.log("!!! ERROR !!!");
process.exit(1);
}

console.log("success!")
});

// start resonate
// this will enable restart with resume semantics
resonate.start();

async function main() {
const id = "foo.1";

// lazily run foo
const promise = await resonate.promises.get(id).catch(() => null);
if (!promise) {
resonate.run("foo", id);
}
}

main();

When you run this program, there is a 50% chance that it will come crashing to a halt. Unlike last time where our function threw an exception, this time we use process.exit() — our program doesn’t stand a chance!

To demonstrate recovery we need to first observe a crash. If you get lucky and the execution succeeds on the first attempt, keep bumping the id until the program crashes. Once a crash occurs, restart the program. On restart any pending executions will be resumed and once again there is a 50% chance we will see another crash, if this happens keep restarting the program until the execution succeeds.

What is going on here? When your program is wired up to a Resonate server, Resonate writes a representation of the function call to storage using a concept called a Durable Promise, the core abstraction upon which Resonate is built. Like familiar promises, Durable Promises can be fulfilled exactly once; unlike familiar promises, Durable Promises are both addressable and persistent.

But what does this mean in practice?

When Resonate is started with a call to resonate.start() a background process is kicked off on an interval to check for any pending Durable Promises. When one is found, Resonate first acquires a lock to ensure mutual exclusion, and then calls the function corresponding to the Durable Promise. This process repeats until either all Durable Promises are fulfilled or timed out.

Key Takeaways

In this inaugural edition of Resonate Recipes we have seen that:

  • Resonate mitigates catchable failures through retries.
  • Resonate mitigates non-catchable failures by restarting executions.
  • Resonate uses Durable Promises to implement failure mitigation (and much more).

If you want dive further into Resonate, check out our docs and our quickstart. If you want to learn more about Durable Promises check out the specification.

In the next edition of Resonate Recipes we are going to tackle the question that is on everyone's mind — what is distributed async await anyways? Stay tuned!

· 10 min read
Dominik Tornow

Resonate is pioneering a novel programming model to distributed computing called Distributed Async Await. Distributed Async Await is an extension of traditional async await that goes beyond the boundaries of a single process and makes distributed computing a first-class citizen.

Given that Distributed Async Await is an extension of async await, I figured a blog post exploring the mechanics of functions, promises, and the event loop would be fun.

info

This post explores the mechanics of async await using Elixir. Elixir's concurrency model offers an excellent platform for implementing the mechanics of async await. However, the approach outlined here is not intended as a guideline for Elixir application development.

The Code on GitHub

Introduction

Many of us were first introduced to async await when we learned JavaScript. Because JavaScript offers one of the most popular implementations, this introduction often shapes our understanding of async await, leading us to conflate the fundamental principles of the asynchronous programming model with the specific implementation decisions made by JavaScript.

The most common misconceptions are that async await necessitates a non-blocking, single-threaded runtime. JavaScript's runtime is non-blocking primarily because it is single-threaded. However, asynchronous programming models can be implemented as both single-threaded and multi-threaded runtimes, and they can be implemented as non-blocking or blocking.

From Sync to Async

The journey from synchronous to asynchronous programming is a shift from sequential to concurrent execution - essentially, instead of doing one thing at a time, we do multiple things simultaneously.
From Sync to Async

We will reason about synchronous and asynchronous programming in terms of pairs of events captured during the execution. We assume that traces contain the following events of interest:

  • in synchronous programming
    • invoke function and return value.
  • in asynchronous programming
    • invoke function and return promise,
    • await promise and return value.

Synchronous Execution

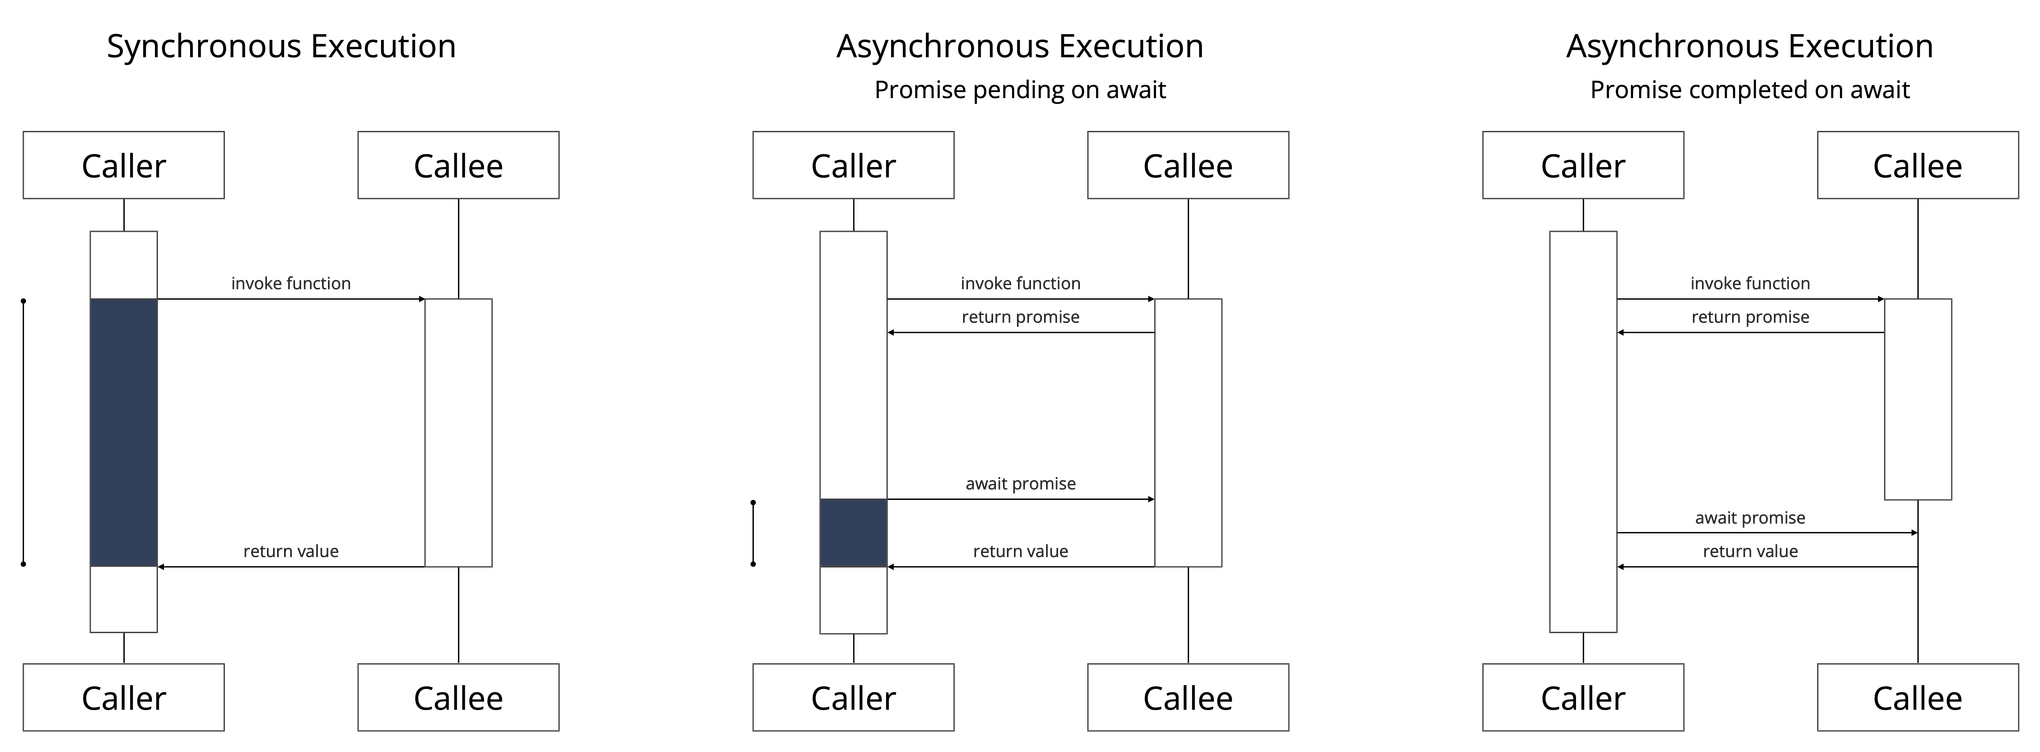
A synchronous execution consists of a single round trip, one invoke-and-return-value interaction between the caller and callee. The caller suspends its execution until the callee completes its execution and returns a value (Figure 1., left).

Asynchronous Execution & Promises

An asynchronous execution consists of two round trips, one invoke-and-return-promise interaction and one await-and-return-value interaction between the caller and the callee.

A promise can either be interpreted as a representation of the callee or as a representation of a future value. A promise is either pending, indicating that the callee is in progress and has not returned a value, or completed, indicating that the callee terminated and has retuned a value.

If the promise is pending on await, the callers suspends its execution until the callee completes its execution and returns a value (Figure 1., center). If the promise is completed on await, the caller continues with the returned value (Figure 1., right).

The Event Loop
From Sync to Async

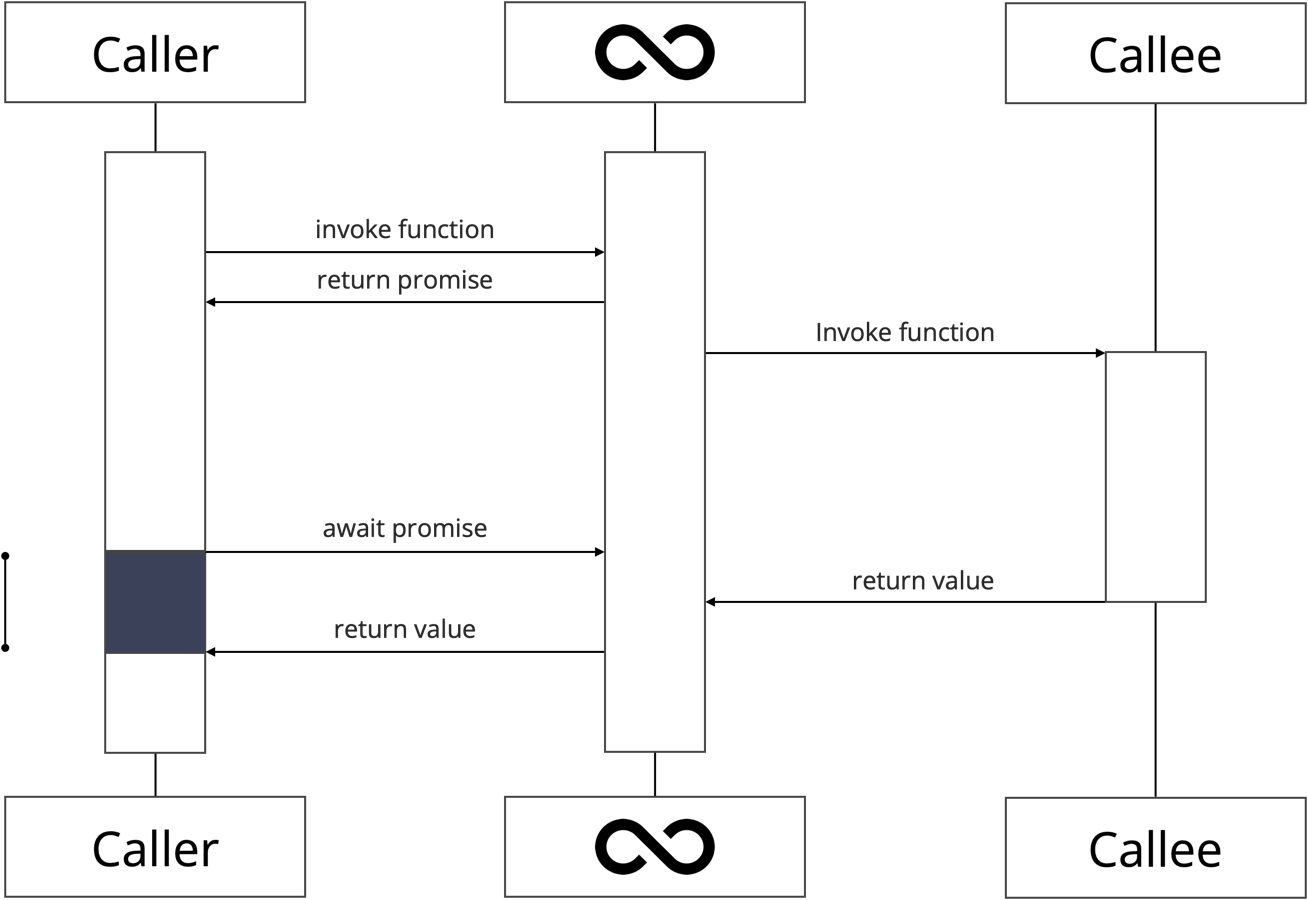
The runtime of async await is referred to as an Event Loop. An Event Loop is a scheduler that allows an asynchronous execution to register interest in a specific event. (In this blog we are only interested in the completion of a promise). Once registered, the execution suspends itself. When a promise completes, the Event Loop resumes the execution.

For the remainder of this blog, we will implement async await facilities and an Event Loop in Elixir. Why Elixir? For starters, mapping async await to Elixir is straightforward, making the implementation an excellent illustration. More importantly, mapping async await to Elixir allows us to dispel the common myth that async await is intrinsically non-blocking: by mapping asynchronous executions onto Elixir processes and deliberately blocking the process when awaiting a promise.

Elixir Crash Course

Elixir is a dynamically typed, functional programming language that runs on the Erlang virtual machine (BEAM).

Elixir's core abstraction is the process, an independent unit of execution with a unique identifier. self() yields the identifier of the current process. All code executes in the context of a process. Elixir processes execute concurrently, with each process executing its instructions sequentially.

# Create a new process - You can use the Process Identifier to send messages to the process
pid = spawn(fn ->
# This block of code will execute in a separate process
end)

Processes communicate and coordinate by exchanging messages. Sending a message is a non-blocking operation, allowing the process to continue execution.

# Send a message to the process with identifier pid (non-blocking operation)
send(pid, {:Hello, "World"})

Conversely, receiving a message is a blocking operation, the process will suspend its execution until a matching message arrives.

# Receive a message (blocking operation)
receive do
{:Hello, name} ->
IO.puts("Hello, #{name}!")
end

Arguably the most popular abstraction is a GenServer. A GenServer is a process like any other Elixir process. A GenServer abstracts the boilerplate code needed to build a stateful server.

defmodule Counter do
use GenServer

# Client API

# Starts the GenServer
def start_link() do
GenServer.start_link(__MODULE__, 0, name: __MODULE__)
end

# Synchronous call to get the current counter value
def value do
GenServer.call(__MODULE__, :value)
end

# Asynchronous call to increment the counter
def increment do
GenServer.cast(__MODULE__, :increment)
end

# Server Callbacks

# Initializes the GenServer with the initial value
def init(value) do
{:ok, value}
end

# Handles synchronous calls
def handle_call(:value, _from, state) do
{:reply, state, state}
end

# Handles asynchronous messages
def handle_cast(:increment, state) do
{:noreply, state + 1}
end
end

Async Await in Elixir

The Async Await Module allows the developer to express the concurernt structure of a computation while the Event Loop Module implements the concurrent structure of a computation.

We will map an asynchronous execution of a function on an Elixir process executing the function. We will use the identifier, the pid, of the process to refer to the execution and the promise representing the execution.
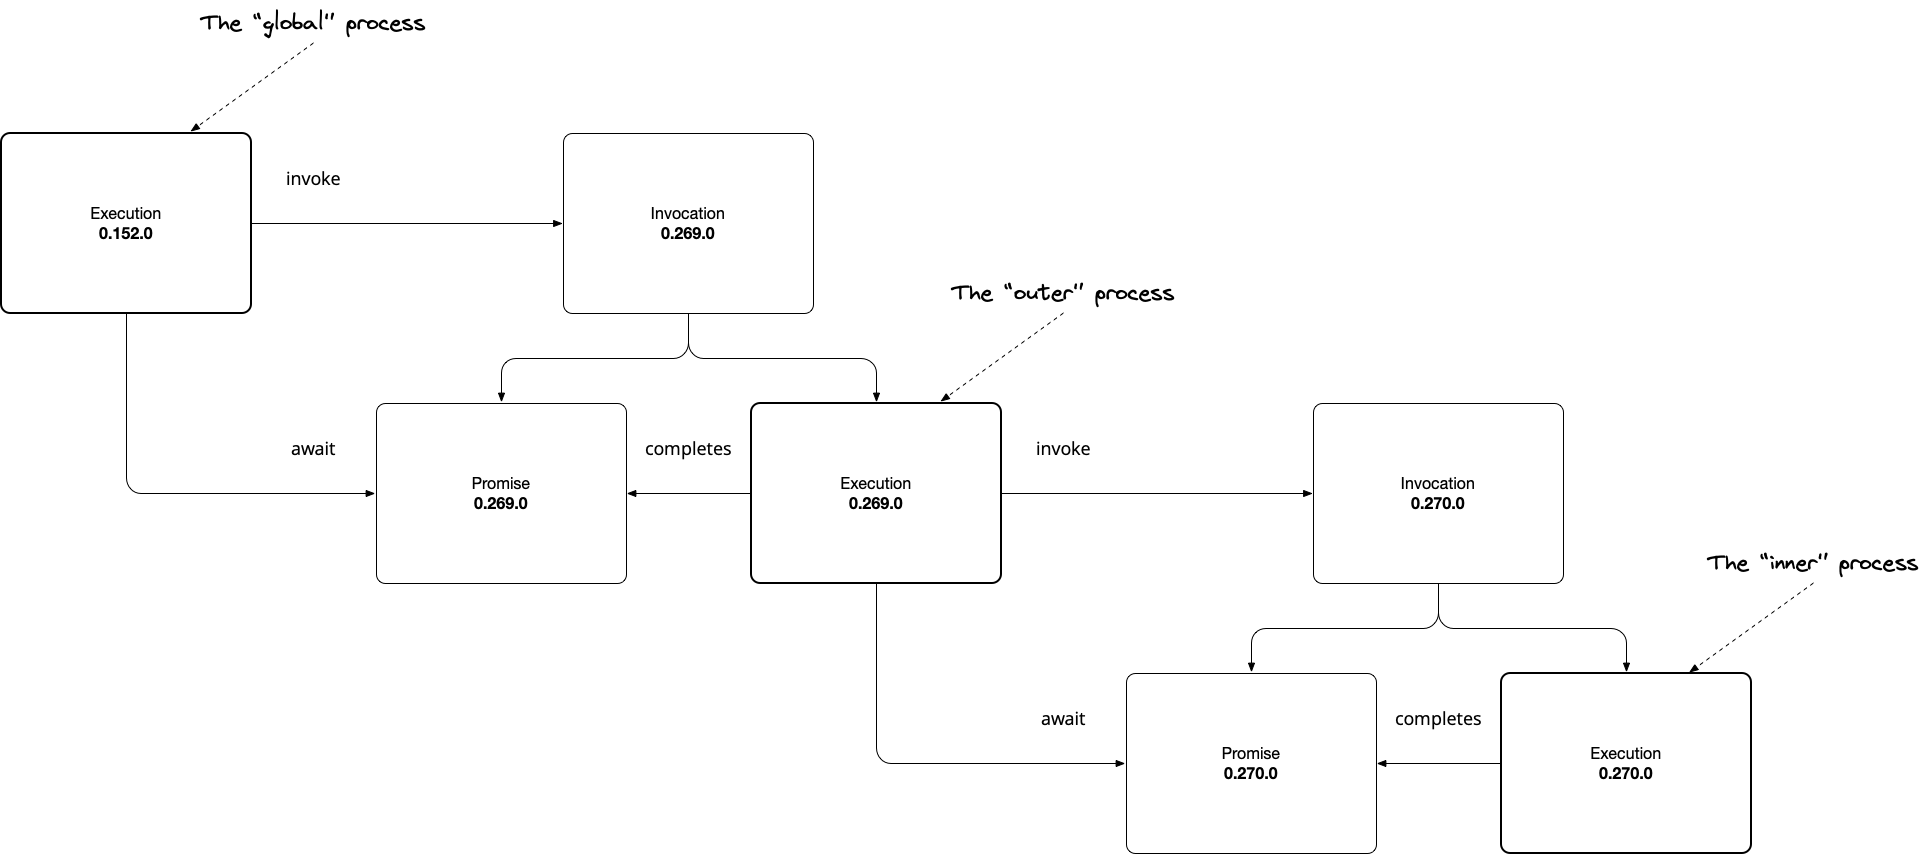
From Sync to Async

Our goal is to run something like this:


# outer refers to the pid of the outer Elixir process
outer = Async.invoke(fn ->

# inner refers to the pid of the inner Elixir Process
inner = Async.invoke(fn ->

42

end)

# We use the pid to await the inner promise
v = Async.await(inner)

2 * v

end)

# We use the pid to await the outer promise
IO.puts(Async.await(outer))

The Library

Let's start with the simple component, the library. Remember there are only two interactions, invoke a function and return a promise and await a promise and return a value. Invoke does not suspend the caller but await may suspend the caller if the promise is not yet resolved.

defmodule Async do
def invoke(func, args \\ []) do
# invoke function, return promise
# will never block the caller
GenServer.call(EventLoop, {:invoke, func, args})
end

def await(p) do
# await promise, return value
# may block the caller
GenServer.call(EventLoop, {:await, p})
end
end

In Elixir terms:

  • GenServer.call(EventLoop, {:invoke, func, args}) is a blocking call, however, as we will see below, the method always returns immediately, therefore, this call never suspends the caller.
  • GenServer.call(EventLoop, {:await, p}) is a blocking call and, as we will see below, the function may not always return immediately, therefore, this call may suspend the caller.

The Event Loop

On to the more complex component, the Event Loop.

The State

The Event Loop tracks two entities: promises and awaiters.

%State{
promises: %{#PID<0.269.0> => :pending, #PID<0.270.0> => {:completed, 42}},
awaiters: %{
#PID<0.269.0> => [
# This data structure allows us to defer the response to a request
# see GenServer.reply
{#PID<0.152.0>,
[:alias | #Reference<0.0.19459.4203495588.2524250117.118052>]}
],
#PID<0.270.0> => []
}
}

Promises

promises associate a promise identifier with the status of the asynchronous execution the promise represents. The state of a promise is either

  • :pending, indicating the execution is still in progress, or
  • {:completed, result}, indicating the execution terminated with result.

Awaiters

awaiters associate a promise identifier with the list of execution identifiers that are waiting for the promise to be resolved: Each pid in the list corresponds to a process that executed an await operation on the promise and is currently suspended, waiting for the promise to be fulfilled. When the promise is resolved, these awaiting processes are notified and can continue their execution with the result of the promise.

The Behavior

By tracking the current status of each async execution via promises and the dependencies between executions via awaiters, the Event Loop can orchestrate the concurrent execution of code. Three methods are all we need:


defmodule EventLoop do
use GenServer

alias State

def start_link(_opts \\ []) do
GenServer.start_link(__MODULE__, State.new(), name: __MODULE__)
end

def init(state) do
{:ok, state}
end

def handle_call({:invoke, func, args}, {caller, _} = _from, state) do
# ...
end

def handle_call({:await, promise}, {caller, _} = from, state) do
# ...
end

def handle_call({:return, callee, result}, {caller, _} = _from, state) do
# ...
end

end

Invoke

The invoke method spawns a new Elixir process and uses the process identifier, assigned to callee, as the promise identifier. The process executes the function via apply(func, args) and then calls the Event Loop's return method to return the function's result and complete the promise.

  def handle_call({:invoke, func, args}, {caller, _} = _from, state) do
# Here, we are using the process id also as the promise id
callee =
spawn(fn ->
GenServer.call(EventLoop, {:return, self(), apply(func, args)})
end)

new_state =
state
|> State.add_promise(callee)

{:reply, callee, new_state}
end

Await

This is the heart and soul of our Event Loop. When we call await, we distinguish between two cases:

  • If the promise is resolved, we reply to the caller immediately (not suspending the caller), returning the result.
  • If the promise is pending, we do not reply to the caller immediately (suspending the caller), registering the caller as an awaiter on the promise.
def handle_call({:await, promise}, {caller, _} = from, state) do
# The central if statement
case State.get_promise(state, promise) do
# Promise pending, defer response to completion
:pending ->
new_state =
state
|> State.add_awaiter(promise, from)

{:noreply, new_state}

# Promise completed, respond immedately
{:completed, result} ->
{:reply, result, state}
end
end

Return

When a process terminates, we iterate through the list of awaiters, replying to their request (resuming the caller) returning the result. Additionally, we update the state of the promise from pending to completed.

  def handle_call({:return, callee, result}, {caller, _} = _from, state) do
Enum.each(State.get_awaiter(state, callee), fn {cid, _} = caller ->
GenServer.reply(caller, result)
end)

new_state =
state
|> State.set_promise(callee, result)

{:reply, nil, new_state}
end

Running the App

Now we are ready to run the application. In case you want to reproduce the results, the code is available as an Elixir Livebook on GitHub.


IO.inspect(self())

outer = Async.invoke(fn ->

IO.inspect(self())

inner = Async.invoke(fn ->

IO.inspect(self())

42

end)

v = Async.await(inner)

2 * v

end)

IO.puts(Async.await(outer))

Running the application will print something like this:

#PID<0.152.0>
#PID<0.269.0>
#PID<0.270.0>
84

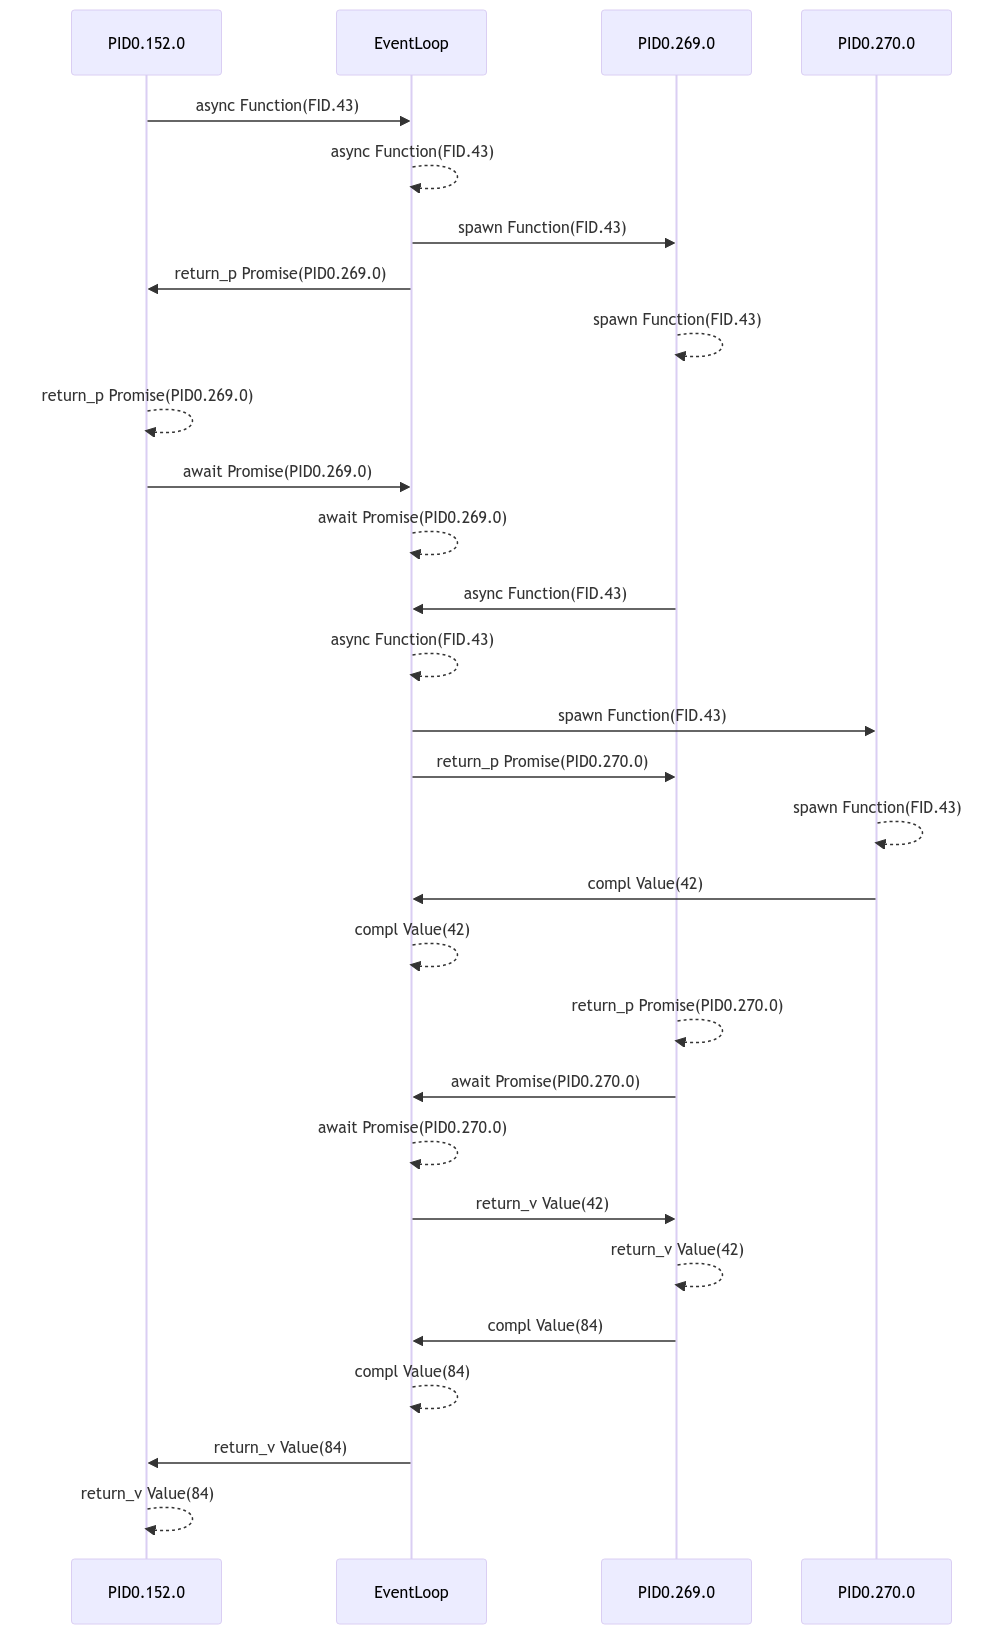
Additionally, we will get a entity diagram and a sequence diagram illustrating the structure and behavior in terms of executions and promises.

Entity Diagram
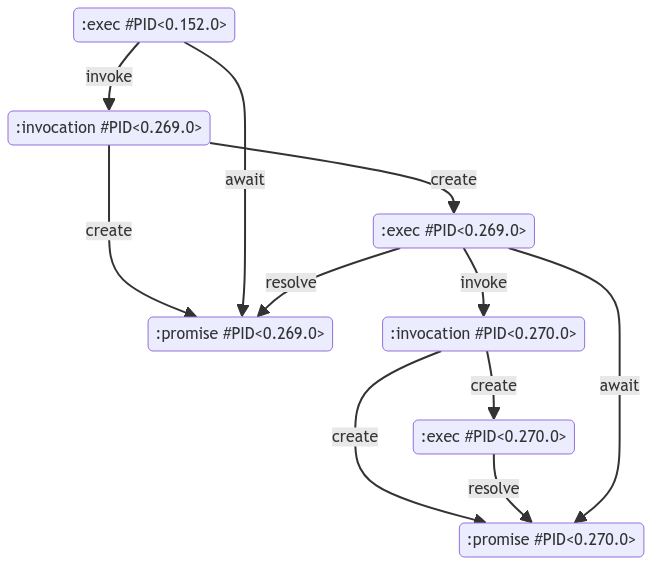
From Sync to Async

Sequence Diagram

From Sync to Async

Outlook

We explored the core mechanics of async await, but there are still more concepts to discover. For example, we could explore promise combinators such as Promise.all (wait for all promises in a list to complete) or Promise.one (wait one promise in a list to complete). Another example, we could explore promise linking, when a function doesn't return a value but returns itself a promise. These exercises are left for the reader.

Conclusion

Async await is a programming model that elevates concurrency to a first-class citizen. Async await allows the developer to express the concurrent structure of a computation while the event loop executes the computation.

If you want to explore a programming model that elevates distribution to a first-class citizen, head over to resonatehq.io and try Distributed Async Await 🏴‍☠️

· 4 min read
Gabriel Guerra

As open source software becomes critical infrastructure powering our online lives, ensuring correctness and reliability is crucial. In this post, I'll explain how formal modeling languages like P can help open source projects design distributed systems that work reliably at scale.

What and Why Formal Methods?

Formal modeling is a technique that uses mathematically-based languages to define and verify software systems. The primary goal of formal modeling is to help developers clearly specify the expected behavior of a system before writing any code. This approach offers several key advantages:

  1. Clarifying assumptions: Formal modeling acts as a thinking tool, forcing developers to make their implicit assumptions explicit. By clearly defining the system's behavior and constraints, developers can identify and address potential issues early in the development process.
  2. Early detection of design issues: By modeling the system's behavior at a high level, developers can iterate and debug the design before writing any production code. This helps catch design flaws and inconsistencies early, saving time and effort in the long run.
  3. Serving as documentation: Formal models can serve as technical specifications for new contributors, providing a clear and unambiguous description of the system's expected behavior. This helps new team members understand the system more quickly and reduces the risk of misinterpretation.

In recent years, the adoption of formal modeling has become more accessible thanks to new languages like P. These languages map formal modeling concepts to ideas that software engineers are already familiar with, such as state machines, events, and conditional logic. By using concepts that developers already understand, these languages lower the barriers to entry and make formal modeling more approachable for a wider range of software development teams.

Modeling State Machines and Events

P represents distributed systems as communicating state machines, matching engineers' mental models. Additionally, P allows modeling various message delivery semantics (e.g., at most once, at least once, ordered, unordered) and failure scenarios (e.g., crash with/without recovery, persistent/volatile memory), but these must be explicitly implemented by the developer.

For example, here is some P code we are using to model a distributed worker protocol:

PSrc/Worker.p
// Payload type associated with eSubmitTaskReq.
type tSubmitTaskReq = (task: Task, taskId: int, counter: int);

// State machine modeling a stateless worker.
machine Worker {

// Simulate volatile memory.
var task: Task;
var taskId: int;
var counter: int;

start state init {
on eSubmitTaskReq goto ClaimTask with (req: tSubmitTaskReq) {
task = req.task;
taskId = req.taskId;
counter = req.counter;
}
}

state ClaimTask {
entry {

// Simulate message loss.
if($) {
send task, eClaimTaskReq, (worker = this, taskId = taskId, counter = counter);
}

goto WaitForClaimResponse;
}

// Simulate worker crash and restart.
on eShutDown goto init;
}

// More states and events that a worker might experience...
}

Safety and Liveness Specifications

In any distributed system, two crucial properties that developers must verify are safety and liveness:

  • Safety - Nothing bad happens (no invalid state or crashes)
  • Liveness - Something good eventually happens (tasks complete)

Verifying these properties can be challenging due to the combinatorial explosion problem, where many distributed system bugs only manifest under specific and rare conditions. To tackle this issue, a tool like P runs many possible interleaved schedules of events through your modeled state machines and tests against your system’s safety and liveness specifications. By exercising the system in various ways under a formal model, developers can identify and eliminate entire classes of bugs before proceeding to the implementation phase.

Here is a code snippet of the liveness specification we use for our distributed worker protocol:

PSpec/ResonateWorkerCorrect.p
// GuaranteedTaskProgress checks the global liveness (or progress) property that for every
// eTaskPending raised a corresponding eTaskResolved or eTaskRejected eventually follows
spec GuaranteedTaskProgress observes ePromisePending, ePromiseResolved, ePromiseRejected {
start state Init {
on ePromisePending goto Pending;
}

// Eventually you want to leave the hot state and go to a cold state.
hot state Pending {
on ePromiseResolved goto Resolved;
on ePromiseRejected goto Rejected;
}

cold state Resolved {}

cold state Rejected {}
}

Benefits for Open Source Projects

Open source communities are ready to shake up distributed systems development by embracing formal modeling techniques. Like how test-driven development changed software engineering, formal modeling can really boost the quality, understandability and reliability of complex networked systems made by open source projects.

Conclusion

We are seeing notable achievements within Resonate by leveraging P to model and enhance new distributed components, like our worker protocol, prior to implementation. For the complete code base, please visit our GitHub repository and checkout our model yourself.

· 8 min read
Dominik Tornow

At Resonate, we consider deterministic simulation testing (DST) to be a cornerstone of our mission to build correct and reliable distributed systems. While an increasing array of projects, including Foundation DB, TigerBeetle DB, and Resonate itself, have embraced DST, along with companies like Antithesis providing platforms dedicated to this approach, comprehensive information remains limited.

In this post, we’ll demystify DST by constructing an accurate yet concise mental model. We will explore the theoretical foundations as well as practical applications—and why I believe DST will soon become indispensable for developing distributed systems.

The Challenge

The task of testing concurrent and distributed systems presents formidable challenges: concurrency introduces non-determinism manifested through unpredictable execution order while distribution introduces non-determinism manifested through unpredictable partial failures, creating a vast behavior space to consider.

Notably, execution traces resulting from rare event combinations are particularly elusive. These are not only challenging to observe, but also even more challenging to reproduce, giving rise to the infamous Heisenbugs.

A System's Multiverse

Concurrency results in non-determinism in the form of random execution order: The concurrent composition of a set of processes refers to the set of all possible interleavings, so given two processes P = ⟨a, b⟩ and Q = ⟨c, d⟩, the set of all possible interleavings is:

P | Q = { ⟨a, b, c, d⟩, ⟨a, c, b, d⟩, ... ⟨c, d, a, b⟩ }

Distribution results in non-determinism in the form of random partial failures: adverse events like crashes or network partitions further complicate interleavings:

P | Q | 💀

We can argue that due to the non-determinism introduced by concurrency and distribution we are not dealing with one but many systems-one per possible interleaving

Traditional testing methodologies, including unit, integration, and end-to-end tests, often prove inadequate for holistically capturing the safety and liveness properties of a concurrent, distributed system. Due to the inherent non-deterministic nature of systems, tests are not reproducible.

This gap in the testing landscape is bridged by deterministic simulation testing, positioning itself between non-determinsitic simulation testing (e.g. jepsen or chaos engineering) and formal methods (e.g. TLA+, p-lang).

Comparism

Non-Determinisitic Simulation Testing

Non-determinisitic simulation testing identifies correctness violations by validating the system itself. Tools such as Jepsen follow a probabilistic, non-reproducible exploration of possible execution traces to find correctness violations by elevating the propability of rare execution traces self-induced by frequent process crashes and network partitions. Their primary limitation is reproducibility; despite increased chances of bug detection, their sporadic nature hampers consistent reproduction for subsequent analysis.

Formal Methods

Formal methods identify correctness violations by validating a formal model of a system. Tools such as TLA+ follow a determinisitc, reproducible exploration of possible execution traces to find correctness violations. Their primary limitation is the model-system discrepancy; a correct conceptualization (mode) does not imply a correct implementation (system).

Deterministic Systems

Understanding deterministic simulation testing hinges on understanding deterministic execution. Let's demystify deterministic execution by constructing a minimal system model illustrated through a practical GoLang example.

System Model

A system's execution unfolds in a series of discrete steps, that is, discrete events (called a trace) governed by the rules of its runtime environment. Each event is categorized as either observable (external) or non-observable (internal) based on its relevance to us.

A system is deterministic if there exists only one possible trace of external events.

In essence a determinisitc system is a system without choice.

Formal Model

An external trace or trace is a projection of a complete trace containing only external events where the deliniation of internal and external events is user supplied.

trace = ⟨e₁, e₂, e₃, eₙ⟩, with eᵢ ∈ External 

The function traces maps a System S and the Initial State σ under the evaluation rules of a Runtime R to the set of all possible external traces.

traces(S, σ, R) = {trace₁, ... traceₙ}

A system is determinitic if for every Initial State σ, the cardinality of the set of traces for System S under Runtime R is 1:

∀ σ ∈ Σ : | traces(S, σ, R) | = 1

A system is non-deterministic if there exists an Initial State σ such that the cardinality of the set of traces for System S under Runtime R is larger than 1:

∃ σ ∈ Σ : | traces(S, σ, R) | > 1

Example

With the theoretical foundations in place, let's explore a practical application. Consider the following GoLang example, which sums up the values in a key-value map. For this illustration, we'll define the trace of the execution as the lines printed to standard output, where the events are labeled as i:number, v:number, and s:number.

GoLang does not specify an iteration order for key-value maps, in fact, golang explicitly randomizes the iteration order so software engineers don't implicitly rely on an unspecified order. Two different executions of the program may produce different traces.

package main

import "fmt"

func main() {
// Create a map with string keys and integer values
myMap := map[string]int{"key.1": 2, "key.2": 3, "key.3": 5}

// Initialize a variable to hold the cumulative sum of the values
sum := 0

// Print the initial value
fmt.Println("i:", sum)

// Loop over all key-value pairs in the map
for _, value := range myMap {
// Print the current value
fmt.Println("v:", value)
// Add the value to the sum
sum += value
}

// Print the final total sum of the values
fmt.Println("s:", sum)
}

Is this program deterministic? The answer hinges on our classification of events. If we consider i:number and s:number as external events but v:number as an internal event, the program is deterministic as the set of all possible traces has only one element:

i:0 -> s:10

If we consider i:number, s:number, and v:number as external events, the program is non-determinitic as the set of all possible traces has six elements:

i:0 -> v:2 -> v:3 -> v:5 -> s:10
i:0 -> v:2 -> v:5 -> v:3 -> s:10
i:0 -> v:3 -> v:2 -> v:5 -> s:10
i:0 -> v:3 -> v:5 -> v:2 -> s:10
i:0 -> v:5 -> v:2 -> v:3 -> s:10
i:0 -> v:5 -> v:3 -> v:2 -> s:10

This example highlights how the same program's determinism or non-determinism hinges on our perspective—specifically, on our definitions of internal versus external events.

Deterministic Simulation Testing

We delineate a system into two main components: application and environment. The application and the environment interact via a well defined protocol (API).

System Model

The delineate of application and environment-while ultimately determined by the system designer-follows the philosophie of deliniating of the orchestration of commands (application) and the execution of commands (environment).

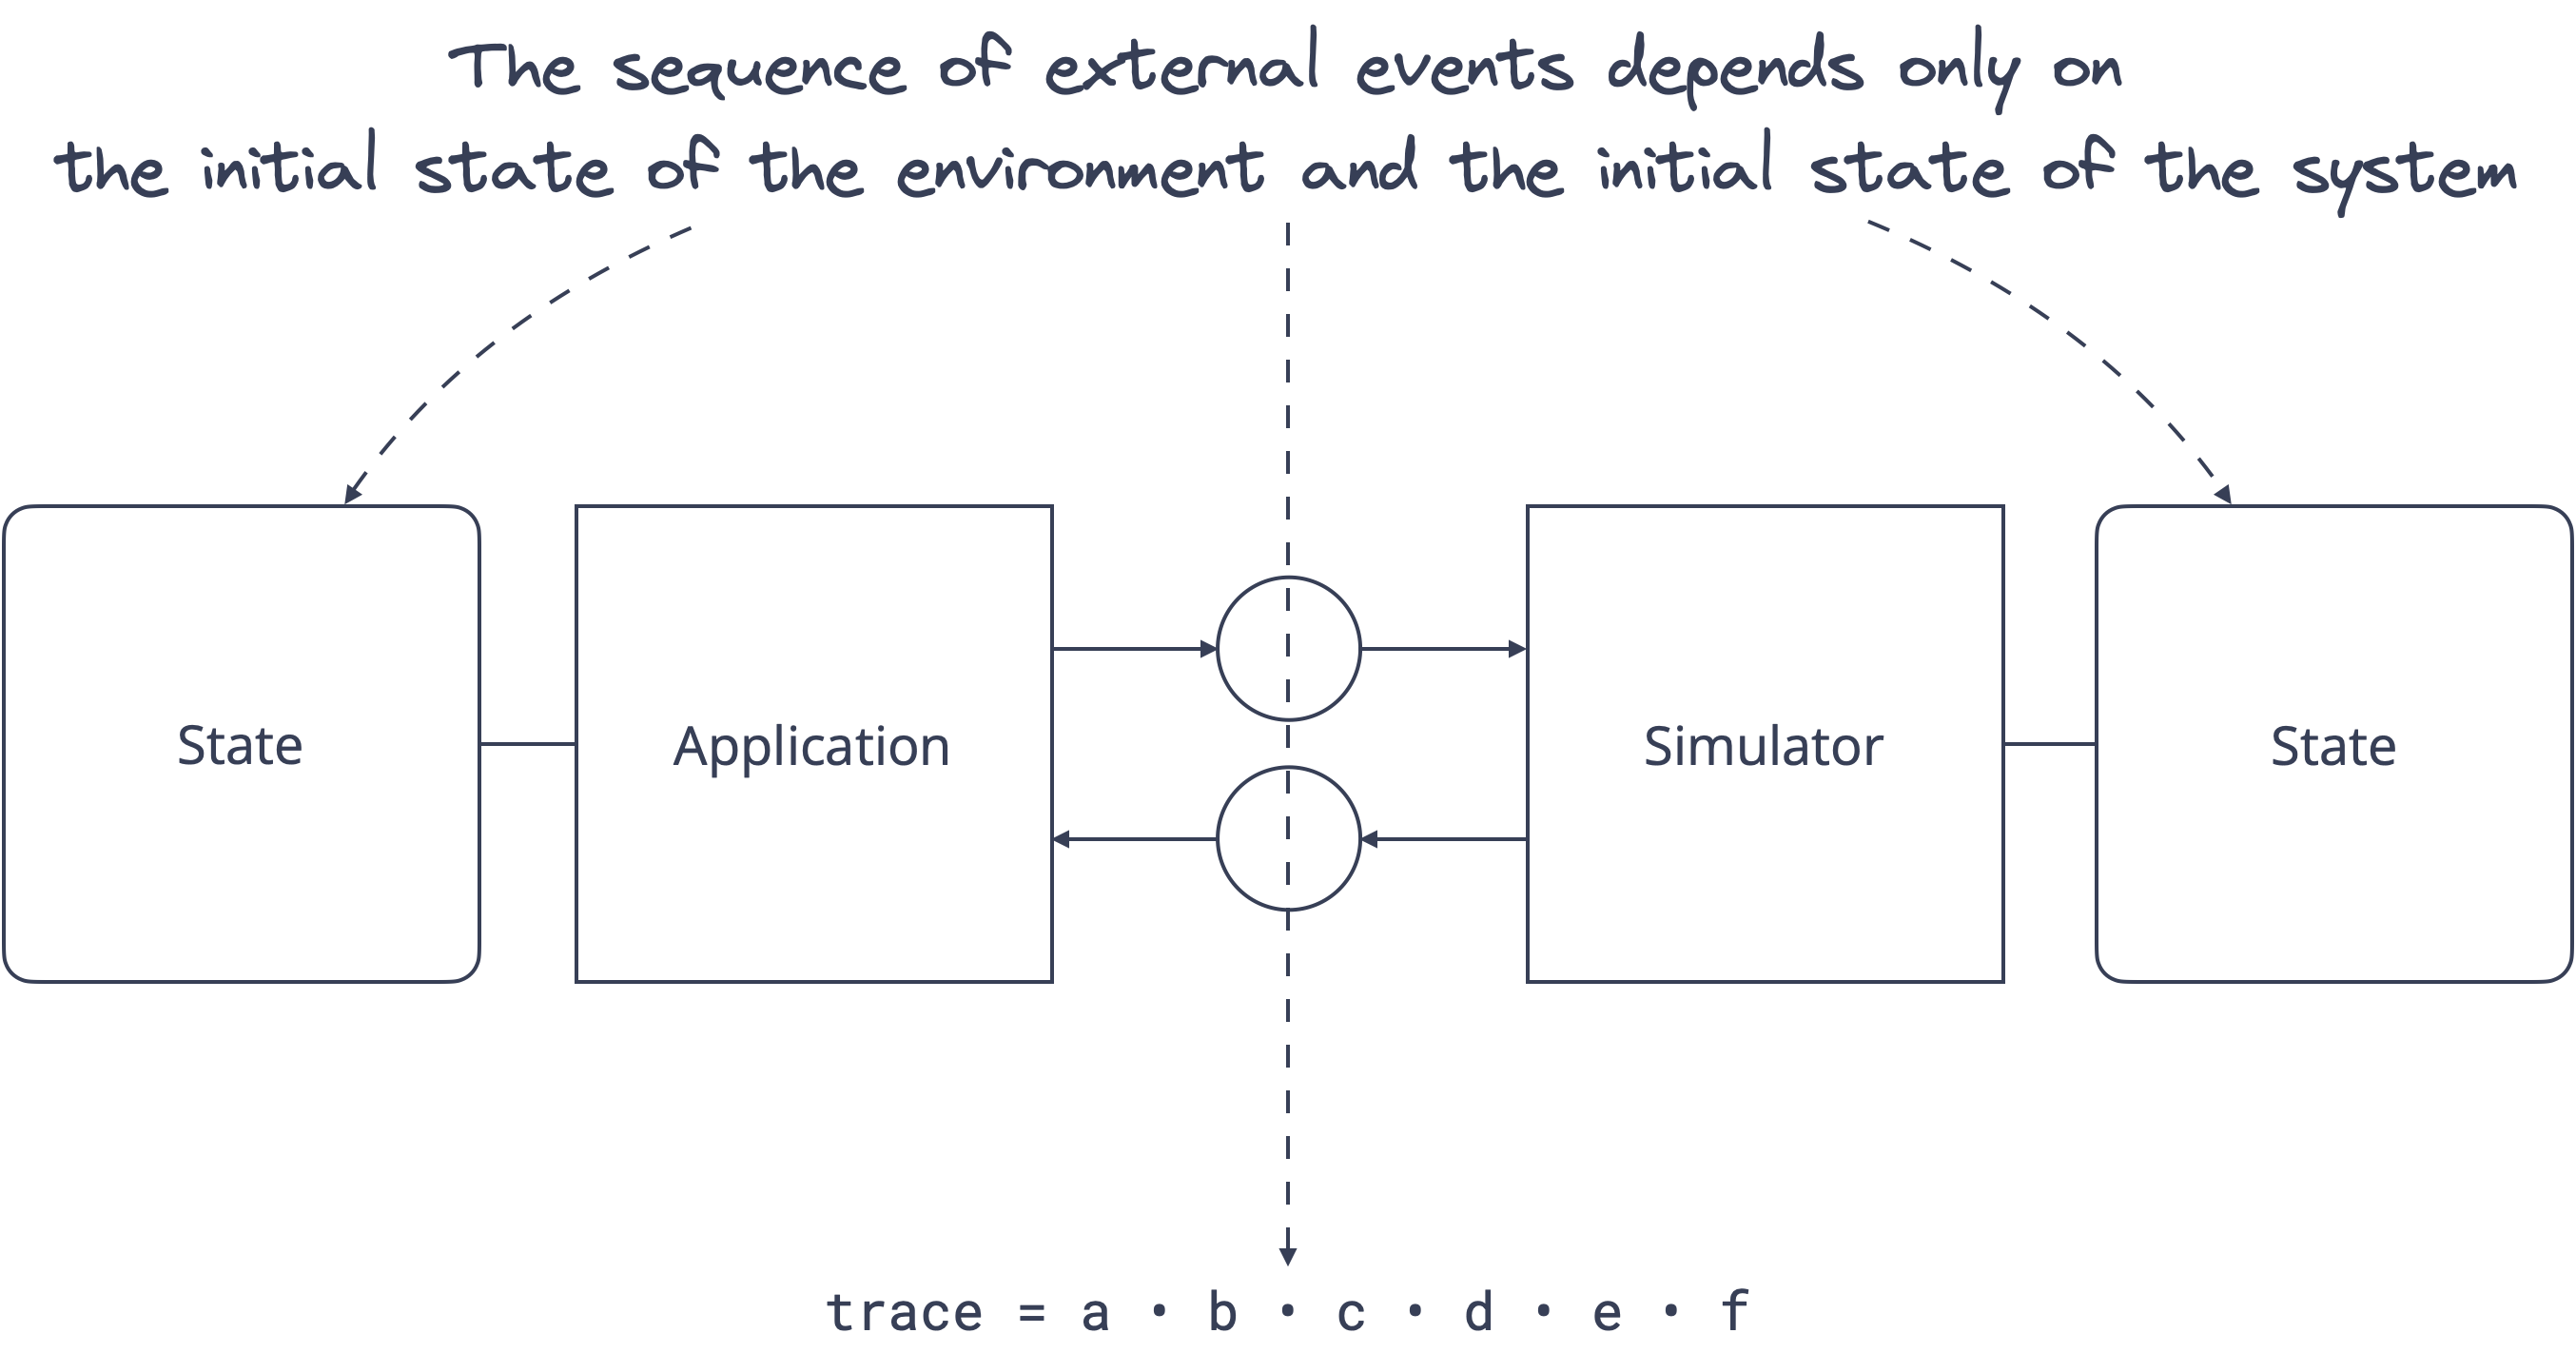
The core idea is to substitute the environment with a simulator: Deterministic simulation testing repeatedly executes an application in a simulated environment under changing initial conditions, monitoring that the correctness constraints are maintained across executions.

Deterministic Simulation Testing

The composition of application and simulator must yield a deterministic system, that is, given the same initial state, the system will always yield the same trace of external events.

Now the progression of the system is determined by the intial state of the system. In practice the minimal initial state is the seed for a pseudo random number generator that the simulator uses to drive the system forward.

With this you can reproduce an entire execution by restarting the system with the same random seed.

It's about time

Many complex systems depend on real time in some way. For example, a stream processing system may offload a batch from hot storage to cold storage two weeks after creation of the batch. Time dependent code path are hard to test—and even harder to test repeatedly.

A side effect not of deterministic simulation testing but of virtualizing the environment is virtualizing time: The simulator does not only simulate the execution of commands but can also simulate the progression of time. This allows us to simulate months or years of continuous operations in mere hours of testing.

Limitations

Deterministic simulation testing is a capable but intrusive technique: The composition of application and simulator must yield a deterministic system-a high bar to meet. For example, if you target golang you have no contol over goroutine scheduling, forcing you to "work around" golangs concurrency abstractions by building your own.

Conclusion

Deterministic simulation testing is invaluable to our mission to build correct and reliable distributed systems. In the next blog post I will detail Resonate's implementation of deterministic simulation testing in golang. In the meantime, head over to our repository and check out our implementation yourself.

· 4 min read
Dominik Tornow

Every now and then, a blog post pops up in which the author details their journey behind constructing their own queueing subsystem for their project-more often than not in the form of their own job or task queue. These tales of technical triumphs and tribulations, while fun to read, often omit a pivotal question:

Should you choose a technology that insists on implementing its own queuing subsystem?

In this post, we'll explore the unseen challenges of custom queueing subsystems, and why they might not be the best choice for your application.

Custom queueing subsystems

Choosing a technology that insists on implementing its queuing subsystem is a decision with significant considerations. As the tech landscape explodes with solutions claiming to offer the best in terms of scalability and reliability, we should explore the consequences when a technology brings its own queuing subsystem to the table.

The theoretical benefit

Let's acknowledge - but put aside for a moment - that implementing a correct, scalable, and reliable queueing subsystem is a formidable engineering challenge. Unless the vendor has significant experience in building queueing subsystems, their custom queue is at risk to fall short of expectations.

At first glance, the integration of a custom queuing subsystem within a technology stack might appear as a promise that the technology is uniquely engineered to address specific challenges. But does this argument really hold up under scrutiny?

During Prime Day 2023, AWS SQS processed 86 million messages per second. Today, AWS EventBridge matches more than 2.6 trillion events per month for over 1.5 million customers with diverse use cases. In light of these figures, a vendor's claim that their unique requirements necessitate a proprietary queuing subsystem deserve a healthy dose of skepticism.

The practical drawback

The dubious claims of the benefit of a tailor made solution are met with the very real costs that come by adopting custom queues.

Queues are foundational technologies, deeply integrated within vast ecosystems, rather than standalone components.

Consider AWS offering Simple Queue Service (SQS) as part of an extensive ecosystem. SQS does not exist in isolation but is a cog in a much larger machine, seamlessly integrating with services like AWS EventBridge and AWS Lambda. These services provide advanced functionalities such as event matching, event routing, and serverless computing, all while ensuring robust security through embedded authentication, authorization, and comprehensive logging and monitoring features.

Or consider NATS. NATS offers additional functionality going beyond queueing systems such as the NATS key value store or the NATS Execution Engine to host functions and services.

By insisting on their own proprietary queues, vendors shut the door on your application from taking advantage of a rich ecosystem-or, if you already made significant investments into this ecosystem, make it hard for you to reap the benefits.

The vendor wolf in sheep's clothing

Forcing a user to commit to a proprietary queue serves as a "wolf in sheep's clothing", subtly promoting vendor lock-in. Opting for a proprietary queue ties a significant portion of your system to a single provider, effectively restricting future options. Such exclusivity forces you to stake your success on the provider's technology.

When considering queuing solutions, the broader implications of vendor lock-in, and the benefits of a versatile, open architecture should guide your decision-making process.

The out-of-the-box argument

Vendors argue that because they embed their own queue, everything works out-of-the-box without the need to set up additional infrastructure.

That argument is a red herring: you can provide an out-of-the-box queueing solution that has the same status as other queueing systems. If the user has a choice between your queue and any other queue, the user is free to opt for an out-of-the-box or best-of-breed setup, never locked in into one choice, free to make changes, and free from vendor lock in.

The Solution

Implementing a custom queueing subsystem need not exclude the embrace of established queueing solutions. By adhering to a philosophy of openness and interoperability, vendors can empower users with the freedom to choose between an out-of-the-box solution and the best-of-breed alternatives. Furthermore, this approach allows for the flexibility to reevaluate that choice as applications evolve.

Conclusion

When evaluating a technology stack, consider carefully whether the technology mandates the use of its custom queueing subsystem. A balanced and flexible approach is one where the technology offers an out-of-the-box experience with its own queueing system but also supports seamless integration with alternative queueing providers.

But a technology that enforces the use of its own queue, denying you the freedom to choose, should be viewed with caution

🚩

· 3 min read
Dominik Tornow

As software engineers, we are familiar with a range of programming models, for example imperative, functional, declarative, or object-oriented programming. These paradigms are tools in our toolbelt, each influencing our approach to solving problems.

At Resonate HQ, we are building a novel programming model, Distributed Async Await. Distributed Async Await extends async await beyond the boundaries of a single process, making distributed computing a first-class citizen.

So in this blog post, we will address the question "What is a programming model?"

Programming Model

A programming model or programming paradigm is a conceptual framework that guides and constrains how we think about problems and their solutions.

Like any conceptual framework, a programming model is a set of concepts, relationships among these concepts, and constraints on the relationships. For example, in object-oriented programming, core concepts are Classes and Inheritance relationships between Classes. Inheritance relationships are constrained to form a directed acyclic graph.

When choosing an object oriented programming language, this framework is the lense through which we reason about problems and their solutions. In the context of object oriented languages, the lens even has a name: the lens through which we view problems is called object oriented analysis and the lens through which we view solutions is called object oriented design.

Beyond Programming Languages

However, a programming model is not only defined by a programming language but by the totality of the environment. Libraries, frameworks, and platforms have the ability to change the set of concepts, relationships, and contstraints.

For example, even when writing object oriented programs, your programs change significantly when you add threads. Your programs do not stop being object oriented programs, but they start to become concurrent programs, a change that forces you to think about problems and solutions differently than before.

Even seemingly small changes can have big impacts. For example, adding retries in case of failure changes the execution semantics from at most once to at least once, requiring you to look at the problem and the solution in a different light. Now you have to ensure that all of your functions are idempotent to guarantee correctness.

Distributed Async Await

Resonate's vision is to provide a programming model for distributed applications that not only meets technical demands but provides a delightful developer experience based on traditional async await.

Async await is a programing model that allows the developer to express the concurrent structure of function executions. In effect, async await allows the developer to express concurrency and coordination on one machine.

Distributed Async Await is a programing model that extends async await and allows the developer to express the distributed structure of function executions. In effect, Distributed Async Await allows the developer to express concurrency and coordination across machines.

By extending instead of replacing async await, we've created an incremental transition from the world of concurrent programming models into the world of distributed programming models. You don't have to rewire your brain, instead you can build on your knowledge and experience to extend your horizon.

🏴‍☠️

· 3 min read
Dominik Tornow

Software engineers are getting crushed by the complexity of distributed systems. Engineers waste time writing boilerplate code for retries, recovery, rate limiting, and observability yet still applications break in production.

Why? Traditional programming models were not designed for the unique challenges of distributed applications.

Resonate's programming model, Distributed Async Await, extends the widely popular async await programming model and goes beyond the boundaries of a single process, making distributed computing a first-class citizen.

Design Principles

Resonate's vision is to provide a programming model for distributed applications that not only meets technical demands but provides a delightful developer experience. After all, who doesn't want to be delighted?

Async await provides a delightful developer experience when we need to express concurrency and coordination in a single process. Launching hundreds or thousands of concurrent tasks and collecting their results can be done in just a few lines of code. But across multiple machines? Async await's previously delightful developer experience quickly becomes dreadful, a few lines of code turn into a never ending nightmare.

What happened? Well, async await was designed to make concurrent programming simple, async await was not designed to make distributed programming simple.

A delightful developer experience makes a task at hand Dead Simple. At Resonate that's not just a catch phrase but the bedrock of our engineering philosophy, and grounded in our principles.

  • 🏴‍☠️ A Dead Simple programming model should be built with a minimal set of abstractions; those abstractions should be as general as possible so they can be uniformly applied in all areas.

  • 🏴‍☠️ A Dead Simple programming model should be comprehensible to a single software engineer with minimal overhead.

A consistent abstraction lays the foundation for building applications of any scale, from the smallest to the largest, from the most simple to the most complex. This uniformity guarantees consistency and predictability at every step. If any part of the programming model works differently from the rest, that part will require additional effort to comprehend.

Therefore, a programming model with a delightful developer experience not only implies a programming model that is Dead Simple to use but also Dead Simple to understand.

Distributed Async Await

Based on these principles, we designed Distributed Async Await to be an extension of the traditional async await programming model.

Like traditional async await, Distributed Async Await is built on the concept of functions and promises, the universal abstractions to express concurrency, coordination, and integration. Distributed Async Await elevates the traditional paradigm beyond the boundaries of a single process, making distributed computing a first-class citizen

By extending instead of replacing async await, we've created an incremental transition from the world of concurrent programming into the world of distributed programming. You don't have to rewire your brain, instead you can build on your knowledge and experience to extend your horizon.

🏴‍☠️